Techniques for editing a documentary film
Long-format documentary film editing is more than just a technical endeavour of putting clips together in an NLE timeline. Of course, you know that already. You’ve shot your documentary film, over several weeks or even years. Now you need to put it all together in a coherent and engaging film that audiences will love and with which they will engage. Your first step is to create the story arc, before venturing into the buttons and toggles of an NLE. I do this part of the editing on paper. Editing a long-form documentary film requires a good deal more thought and diligence than say when editing a short 3-minute feature. Any tools that would help in this process of developing the story arc would be welcome.
I’ve found the techniques below have helped me in documentary film editing and am sharing them in this post.
Step 1: Analyse the Rushes (b-roll)
The first step when starting out with editing a new documentary film project is to see what ingredients we have. The best intentions of a director come to nought if there’s no usable footage. I’ve seen such projects and was able to identify problems to the director before he put in time and money into post-production on his film. By looking through the rushes, it’s possible to see if we are ready to cut or production still needs to be done.
As a first step, I use my NLE Adobe Premiere Pro CC to bring in the rushes, organise them into bins and meta tag the clips, so they are easy to find later in the editing process when the time is in short supply, and the director or producers are breathing down your neck.
I tag clips to mark them as good clean shots, indoors, outdoors as well as specific locations that make sense for the film I’m editing. I also tag clips with character information (who’s in the clip). Finally, I tag for moods/emotions like dark, happy, emotional etc. You can go to any lengths during this stage. It depends on the time you have at your disposal. For projects on tight schedules, I go through the rushes, organise footage into bins and do basic tagging. For longer projects, I spend a few weeks on this stage.
Another option (a better one) is to analyse the rushes during the production phase, while the documentary film is being shot. As an editor, you can watch the dailies (either alone or with the director) and organise and tag.
Step 2: Pick out the Sync
The next stage in the editing project is to break down the sync (audio bytes from interviews) into the basic themes or topics. Since I already have a good idea of the footage available, at the end of this second step in the process, I have a complete list of the topics/themes that have been spoken about and also the complete catalogue of characters who can speak in the film.
As the director, it’s easy to get attached to all the characters you’ve shot. But remember, not all of them can or should end up in the film.

Step 3: Develop the documentary story arc
A story arc takes the story from the beginning, through to the middle, heightens tension as it moves forward and reaches a crescendo – the peak of your story. After this, we bring it back down to normal as quickly as possible. This stage is the denouement. It leaves the main character back in his/her original state, having changed in some way due to his/her journey.
The story arc also gives what’s known in storytelling as the Hero’s Journey.
Once you have the sync and know who your characters are and how well they deliver information on the various themes/topics, your next step is to arrange the sync into some form of story arc. This is the stage I marry the sync to the b-roll I have seen in Step 1. I’m not interested in shot selection, but my purpose is to get some idea of the b-roll scenes that can go with the sync and how it will flow together.
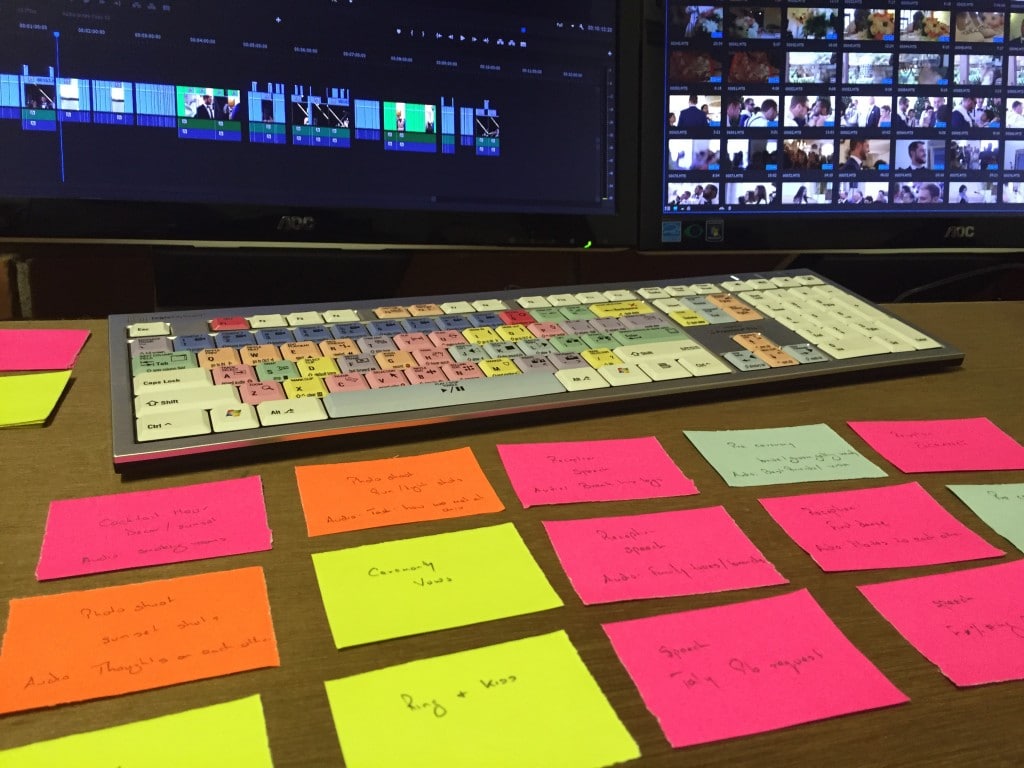
At this stage, I use a technique I picked up from the great film editor Walter Murch. I’d recommend picking up all of his books and scouring the net for his video talks. Priceless gems! Murch uses a system of coloured notes. Jot down one scene in the documentary film on each note. Each scene will have the sync (audio bytes) and the b-roll that can go with that sound bytes. Some scenes will be just b-roll with live action and no audio bytes (just nat sound or music). Other scenes may have just the sync and no b-roll. Most scenes will be a combination.
Each scene, i.e. each paper note, must have a purpose. The purpose of advancing the story arc forward. As yourself, “what purpose does this scene serve?” Then the sync and visuals you choose will match that purpose. At the end of the scene, the viewer must be left asking, “What happens next?” That’s the reason why your audience will stay with you through the film.
Use note colour to represent the main character in the scene. So, for instance, all scenes that have Character A as the main character will have red notepaper.
By using coloured notes, where each colour visually represents a character in the story, I have before me, a visual idea of how the characters will appear in the film and how they interweave in the story. Problems, such as the excessive concentration of a character in one section of the film, are easy to spot at this stage. For instance, you can easily see if a character appears in the beginning and then disappears for a long time before reappearing. Your audience will not be able to connect to them as a result of this gap.

Step 4: Now comes the NLE
So far, we have been working on the edit offline using a paper note system. Once I’m happy with the flow of my note scenes, only then do I attempt to translate it into scenes in the edit suite. That’s when the computer-based documentary film editing begins.
My first task after getting into the NLE post the colour note edit is to put the sync down into the timeline, scene by scene. I’m not interested in b-roll at this stage. In fact, I turn off all the Video tracks in the timeline, focussing on just the sync. I go from the overall and cut it down to the words and syllable. The idea here is to have a sync that’s tight and on point and works as a cohesive whole. By simply listening, and not bothering about the visual, I make sure the cut works from the sync. This is the radio edit – the cut that could be played on the radio and make sense.
Step 5: Marry visuals to Sync
Once I’m satisfied with the flow of the story – the story arc, using just the sync, I then go on to paint in the visuals over that. I use the colour note papers to do this. Scenes without sync are added at this stage too. I’m concerned about marrying the visuals and sync into a rough cut. While I’ve been discussing the edit with the director at each of the previous stages, this is an important point where a director and producer will come in to view a complete (but rough) cut for the first time.
After that it’s a matter of fine-tuning the story arc, perhaps moving scenes around or adding scenes. If you do Steps 2 and 3 meticulously, there are not many of these moves happening now. It’s all about cutting scenes more finely. Begin a scene or clip late and get out early. That’s the mantra. So the viewer is always looking for more as the film hurtles across the arc to the climax and then goes over.
I thought of sharing the techniques I use in editing documentary films. Perhaps it may help others out there. I’m learning a lot from Paddy Bird through the Inside the Edit course on creative editing. If you are looking at upping your film editing skill, highly recommend this course. I also hope to learn from other documentary film editors, your techniques for editing your documentary projects. Do use the comments below to share your techniques.
As a documentary film editor you can use these techniques to edit your own film. But if you are looking for a fresh set of eyes on your project and an editor who will collaborate with you on your documentary film, please use the form below or send me an email with your project details. I love storytelling and love film editing passionately. Sitting there in the semi-darkened suite is my favourite place on earth. It’s where I can explore worlds and bring stories to life.
Happy editing!
(Note: This article has been updated significantly with details of steps to my editing techniques)

